These instructions describe settings of Windows XP SP2 operatig system for connection to the wireless network eduroam. It is assumed that the user has the wireless network card drivers installed (mostly by the notebook manufacturer). Current driver version is recommended.
It is also assumed that the user's eduroam account is functional. Otherwise see the information available at this page.
Preparation
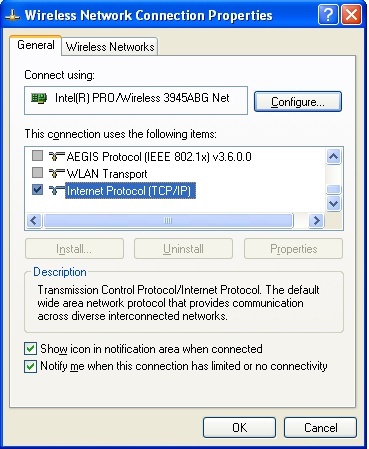
First it is recomended to check whether the relevant network connection has the Internet Protocol (TCP/IP) installed. Above the Wireless Connection icon on the taskbar press the right mouse button and select the Open Network Connectionsoption.
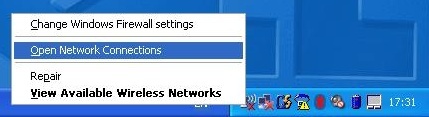
If the taskbar does not contain the Wireless Connection icon, it is possible to open the Network Connections option in the Start - Settings - Network Connections menu.

Right click again above the Wireless Network Connections icon and select Properties.
The Internet Protocol (TCP/IP) should be placed in the General tab. If it is not placed there, it is necessary to install it
You will need a Supplicant program in order to connect via the 802.1x protocol. It is available in the Windows XP Service Pack 2 or later. Upgrade to Service Pack 2 is highly recommended for older versions (SP1, without SP, etc.). Installation of all operating system updates is also recommended.
Wireless Connection Configuration
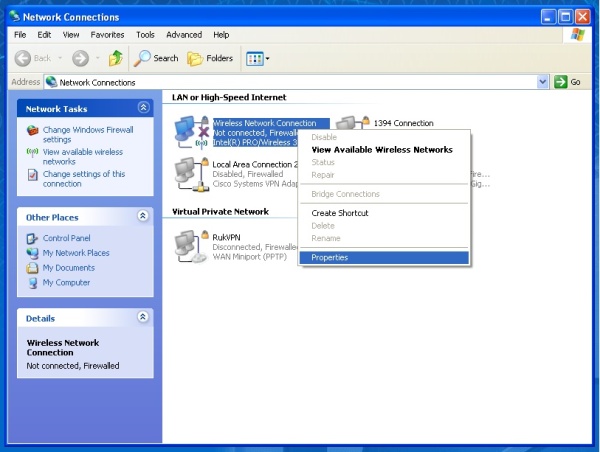
Right click above the Wireless Connection icon on the taskbar and select the Open Network Connections option.
Right click again above the Wireless Network Connections icon and select Properties.

Properties of the wireless connection will be displayed.
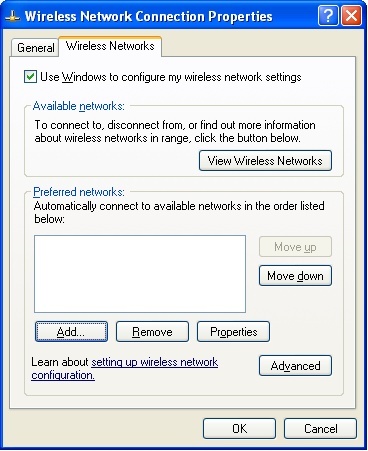
In the Wireless Networks tab press the Add button.

Enter the eduroam network name (SSID) and select the WPA/TKIP mechanism according to the image.
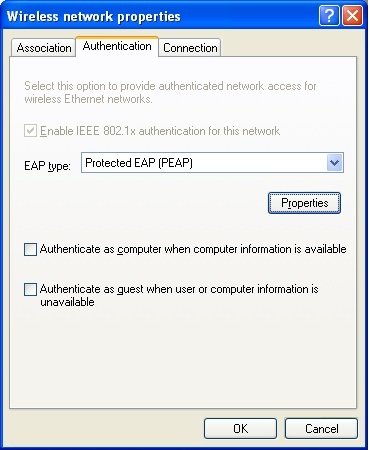
In the Authentication tab set parameters according to the image and press the Properties button.
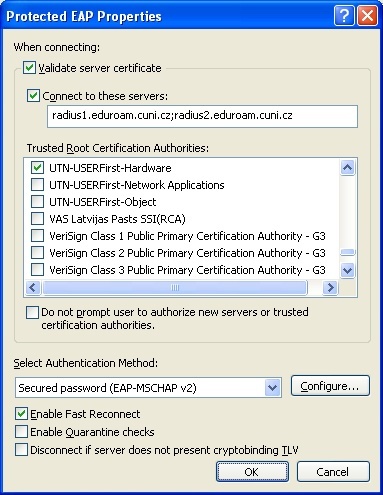
Activate the server certificate verification, enter semicolon separated names of RADIUS servers and select the certification authority according to the image.
Following RADIUS servers are addressed to users of the realms (domains) cuni.cz, uvtuk.cuni.cz, jinonice.cuni.cz, student.cuni.cz and staff.cuni.cz:
-
radius1.eduroam.cuni.cz
-
radius2.eduroam.cuni.cz
Press the Configure button.
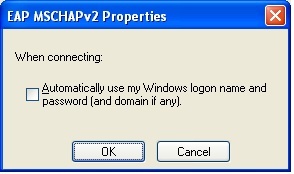
Cancel the option of automatic login name and password from OS. Press OK and subsequently confirm the remaining dialog boxes (3x OK).
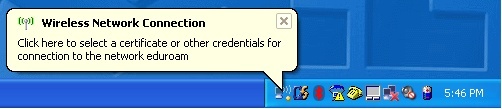
The yellow box will be displayed above the system tray. Click this yellow box and login dialog will be displayed.
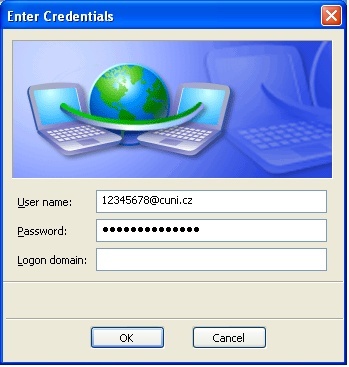
Enter your username including the realm (domain) and eduroam password. Do not copy the example!!! It is assumed that the user's eduroam account is functional. Otherwise see the information available at access data page.

If you have entered a correct name and password, information on successful connecting to eduroam network will be displayed in the system tray and you can use the connection. But note the supported services. If something does not work, first consult the supported services page and make sure whether the operation is allowed within the network.
Username and password will be saved into the system registry after a successful login and for the next connection it is not necessary to enter again the name and password. If you want to prevent saving your login name and password, e.g. for security reasons, you have to remove them from the registry:
-
Click the Start button and select Run...
-
Type regedit in the Open: box and press OK.
-
Find the HKEY_CURRENT_USER\Software\Microsoft\EAPOL\UserEapInfo key and click it.
-
In Edit menu click Remove.
-
Confirm key removing by clicking Yes.
-
Close the Registry Editor.
Name and eduroam logo are registered trademarks of the TERENA.